Monday, December 26, 2011

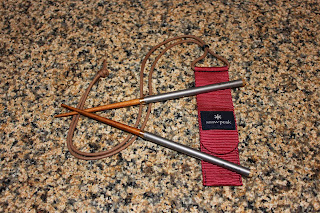
Snow Peak Carry On Chopsticks

New Gear!

My wife gave me a set of Snow Peak's chopsticks for Christmas this year. They're expensive, redundant, unnecessary and aren't a candidate for multi-use gear. With all of that said, I love them! 

Photo courtesy of snowpeak.com
I've always liked them but never picked a pair up because they're expensive ($29) and as I mentioned above, you really don't need them. Since I have some and there are a few interesting details I thought I'd write up a quick post.

Completely Unnecessary
First things first... these are absolutely a luxury item. Other than being small and lightweight they're just about the opposite of what I like about UL gear. Regardless, I'm looking forward to my first mug of ramen with them in the woods.

Simple


1. Remove the cap. It's a brass plug held in by a press fit o-ring. Simple!
2. Remove the wooden tips.
3. Thread the tip on the base & replace the brass caps.
4. Enjoy your meal.


Elegant

The materials are a nice match. The grip is stainless steel with a bead blasted matte finish. The tip is Japanese White Ash. Snow Peak made a deal with Japanese baseball teams to recycle their broken bats into new chopsticks. Nice touch! The threaded joint and rear cap are both made of brass. 


The design shows off Snow Peak's typical refined simplicity. The design geometry, material selection and finish are all understated and show that the designer understood that less can truly be more. The chopsticks are well balanced whether you use them with a high or low grip.

Quality

Fit and finish are fantastic. It's that simple.


Thursday, December 1, 2011

New Product Tease

The dog couldn't be more wrong on this one... long live the FedEx guy! More details will be coming soon but until then here's a little teaser.


Tuesday, November 29, 2011

The Hiking in Finland Advent Calendar

Hendrik over at Hiking In Finland (a fine UL oriented blog) is doing a great holiday giveaway. I'll be taking a shot so prepare yourself! :D

Well done, Hendrik!

From Hiking In Finland:


The Hiking in Finland Advent Calendar

Over the next 24 days you will be able to win each day a piece of kit. From pullovers over backpacks to climbing gear, each day one post with a sweet piece of kit goes online, and will be raffled off to a lucky Hiking in Finland reader. There will be some rules and tasks, though:

1. You only can win once. This adds a bit of a gamble to the whole calendar, and makes you take risks with when & where you post your comment. Of course if you don't win one day, you still can try your luck the next day!
2. Generally you only need to comment to participate, but on some occasions there might be additional stuff you need to do to qualify.
3. It is open to everyone. As in from Afghanistan to Zambia, I send prices everywhere. And as I pay the postage out of my pocket, don't expect priority & signed shipping for huge items.
4. If you win, and I don't hear from you by the next day via Email, you lose and it goes to the second in line.
5. Posts go online in the morning at six, and entering closes at noon - Finnish time. I then will annex the post with the winner (+ 2nd and 3rd places) to keep updates to a minimum.
6. You can't bribe me or anyone involved to win. You use the item(s) on your own responsibility. Use common sense.

That's it, really. The Advent Calendar starts on Thursday, the 1st of December. Become a Follower, subscribe to the RSS feed, follow on Facebook, Google Plus or Twitter to stay up-to-date and don't miss it!


Sunday, November 27, 2011

Fall Singletrack

Life and work has been a little crazy the past few weeks. Its nice to get back out on the trail and find your center. I was lucky enough to ride yesterday and today. I do love bikes.


Make sure you remember what's important to you ... and take time to get out even if its just for an hour or two.

Tuesday, October 4, 2011

Who are you calling lazy?!


Combine a newborn, scorching hot weather and a pinch of laziness and you get a really stagnant blog. Yow!

After last week's beach adventure, I finally have something to write about. We typically spend a week on the Isle of Palms every year to pretend that we still live in Charleston. Normally its much earlier in the summer (and oppressively hot) but we opted for the end of September this year. WIN!!! The temperature was in the mid 80s, the water was warm and the beaches were empty. Paradise.

Tropical Storm Ophelia was hanging out in the middle of the Atlantic when we got there so there was actually moderately clean and rideable surf for the first half of the week.

My board... surfing is simplicity

This wave was easily 4x larger than this just before Jenny took the photo

I took the long boat as well... plans included a paddle up to Caper's Island but that never materialized.

More 8ft monster waves... don't try this at home, kids

 Throw in some Aussie rules frisbee and you're doing it right

We found this blue crab in a tidal pool... Kate was certain that it was going to eat us

All in all, it was a good week but nothing beats a sweet bike & singletrack


Saturday, August 13, 2011

Credit where credit is due

I saw this product pop up as one of Topeak's new features recently. I think I deserve at least a free tool set! :D Are you (still) listening, Topeak?


 Topeak's Rocket Ratchet Line

The set I put together back in 2010 & blogged Sept. 2010

Since then, I've upgraded the ratchet, added an 8mm bit and I've ridden hundreds more miles with it.

Friday, August 5, 2011

What do you carry in your day pack?

Hendrik Morkel wrote an interesting post on his blog about the essential items in your pack. If you don't follow Hendrik's blog I recommend it highly. My approach to gear organization & packing has changed recently so I thought it might be fun and possibly interesting to write a follow-up post to Hendrik's original question.

If you asked me 2 years ago what was in my day pack I would have chuckled. I typically pulled my gear together just prior to the trip. The process wasn't a particularly efficient solution but it worked for me. Occasionally, I'd find myself with too much gear or worse than that I'd forget something. Ultimately, day hikes are just not that critical so it was never really a problem. Now that we have a 2 year old and a 2 month old around the house, I have significantly less free time. I've noticed that this keeps me from getting ready for my longer trips until the dead last minute which can be a little stressful. I'm an analytical guy so after noticing that getting ready for trips was beginning to be no fun I changed the process. The biggest improvement? Keeping my base gear in a pack and ready to go. Simple & effective. So now the big question... What's in there, Don?

I keep the day pack loaded with the essentials to get through an unintended overnight.That strategy is more of an outcome of having the core prepared for packing for bigger trips but its a nice benefit. In short, there's minimal shelter, limited food, water treatment, first aid, fire starting capabilities and a few personal conveniences.

This is what I carry - revel in the brilliance
  1. Food - In this case, ramen with the spice pack replaced by miso, a block of dark chocolate, a pack of instant grits and some Starbucks instant coffee.
  2. Wet Wipes - Becoming a dad has taught me the wonders of these.
  3. Cook kit - My go-to kit is the Trapper mug paired with a Caldera Cone system (more detail on that below) & a few ounces of Heet fuel.
  4. Utensils - Ti spoon & free chopsticks because its just not proper to eat ramen with a spoon. ;) They're resting on a neoprene sunglasses case I use to protect my phone when its in the pack.
  5. Shelter - MLD tarp packs small and light. Perfect shelter from unexpected rain showers.
  6. Essentials - Mini compass, mini whistle & eLite headlamp.
  7. Stakes - To stake things.
  8. Water treatment - Aquamira Frontier Pro & rolled up 1L Platypus.
  9. Miscellaneous - MSR towel & 50ft of reflective line stored in my rock bag.
  10. First Aid - more detail on that below.
  11. Miscellaneous conveniences - more detail on that below
So first a little detail on the cook kit. I've spent a LOT of time over the past few years testing gear in the lab (read: kitchen) and out in the field. Jenny has discovered me on more than a few occasions to find me with alcohol stoves, fans, thermometers and spreadhseets taking over the kitchen. I used to default to my Snowpeak canister stove but I prefer my Trail Designs Caldera Cone system paired with the Trapper mug now. Its small, light, quiet & efficient. Who could ask for more? I keep a few ounces of Heet (yellow bottle) in an old contact solution bottle. (reduce, re-use, recycle, right?)


Trail Designs Caldera Cone & Trapper mug

My first aid kit is pretty simple and I assembled it myself. I keep it in a snack sized ziplock bag. Most commercially available systems are expensive and seem to have either too much or too little. Example: blister treatment. Most of the items in the photo are self explanatory. Let me know if you are interested in a little more detail.


I keep a few conveniences / essentials in a Granite Gear silnyl envelope. From left to right: firestarter packets, Rite In The Rain notebook, pencil (because pens always seem to dry up), mirror, suntan lotion & Dr. Bronners in mini-droppers, the greatest knife on earth & toothbrush / toothpaste.


Most important of all is to remember that there's no right or wrong answer. I had a lot of help putting the photos for this post together from Kate. When I asked her what her essential gear list looked like I got a radically different answer (see photo below). Ultimately, its all about priorities and experience.

So now the question is... What do you carry in your pack?

Kate and her essentials - Its a very princess themed pack but I'm still proud. She's chosing UL princesses at least!

Monday, August 1, 2011

Bear Bag System

There are a few commercially available bear bag systems out there for mind boggling prices. Please don't pay $80 for a bear bag system. You can pull together a simple system for a fraction of the price.

I normally bring an 8L Sea To Summit Ultra-Sil dry bag, 50ft of reflective line, a rock bag and a small carabiner. I'll add a LokSak bag if I really feel the need to hide the food odor. Typically I'm only trying to keep my food dry and out of reach of racoons and other curious critters. You should be able to pull this together for about $40 at full retail. You can easily cut the price down even further by using a simple stuff sack already in your closet and run of the mill rope. Reflective rope and a fully waterproof bag are both nice but not necessary.

The 8L bag keeps my meals organized in my pack as well. Its larger than I need for food storage but I like to throw my mug, toothbrush, towel, etc in there when I call it a night. The less inviting I make my camp site the better. Keeping the aromatic pieces of gear that invite the critters in for a closer look out of reach just makes sense.

My rock bag was lovingly sewn my my mom who is my inspiration for all of my MYOG projects. Its a nice element to have when you're out in the woods. Every time I use my bag to huck a rock over a limb I smile because I know that my mom made this for me. By the way, my rocks go over the limb perfectly the first time - EVERY time.


I keep the rope packed in the rock bag so its contained and easy to find. Having 50ft of line for bagging food is overkill but I frequently use a length of the line for this or that while out on the trail - usually to help someone else that is less prepared. I really like the line that Lawson has over on LawsonEquipment.com. Remember, support the cottage guys when you can. REI is great but nothing beats doing business with a guy that is actually out in the woods doing the same thing as you. Good stuff.

Bridgestone Poster

One of the things I really enjoy about mountain biking and backpacking is the community. I've made friends all over the world simply because of a shared passion for getting out and enjoying what the wilderness offers. One of those friends sent me this image earlier today so I thought I'd share it... proper. (Thanks, Dave - you get it)


Wednesday, July 20, 2011

TNGA Double Fail

So, yesterday's ride made it abundantly clear that my body isn't much in the mood for riding the TNGA this year. I knocked off a meager 22 miles at Harbison and came home with my tail between my legs. It isn't fitness... my body just shuts down. So far the brightest minds in the local medical community can only confirm that I have solid lung volume (~6L) and that I'm devilishly handsome. My lawyers forced me to say that it is possible that one of those statements is embellished. I've been testing an Albuterol inhaler but it turns out that its really no help. Bummed... big time bummed. This must be what its like to wake up and realize that you're Lindsey Lohan. Wait... not that bad.

Tuesday, July 5, 2011

Failure = Success

I took a solo bikepacking trip this past Saturday night. It was a short local trip that covered 30 miles start to finish. To make a long story short, I pulled the plug around midnight for a few reasons. The interesting part is the amount of feedback I've gotten from friends and family implying that the trip was some sort of failure. I've given that reaction a lot of thought and here's why I think they're wrong:

  1. I had lots of fun. It was probably more fun than if I had hung out and left in the morning.
  2. I learned a few things about an unusual situation in the relatively safe local environment. I'll bail on a trip somewhere else without a doubt and I'll be better equipped next time around.
  3. Just like my rule for riding: If you don't crash now and then you're not riding hard enough, you're not getting better and you're not growing. Similarly, if you don't push your gear list to the point of determining that a certain piece of gear won't work you will never know where limits are.
  4. Did I mention that I had fun?

 Headed out... bike lanes in Lexington. Nice.

 My favorite spring board bridge... the return trip in the pitch black of night was fun. This bridge deflects 8-10 inches as you cross. Every time I go over I'm braced for it to let go and drop me in the canal.

A little off trail exploring on the way there... I'd pay for that on the way back out with an under-powered head lamp.

 The gear... it doesn't take much.

 
 Home Sweet Home
 
 A table for one... ramen & miso is a favorite of mine lately.

 
 I just can't stop staring at my bike... Molly was made for this.

 I keep coming back to the MSR HyperFlow filter for a reason.

I decided to call it a night around 9:30pm. I planned on staying up and out later but the bugs were driving me batty. I quickly learned that my bivy (even with the large mesh window around my head) was WAY too hot for a July night in South Carolina. Even with my quilt kicked to the bottom of the bivy I was baking alive. I zipped out and took a nap on top of the bivy for an hour or two. I eventually woke up to the familiar crunch, crunch, crunch of a campsite visitor. I flipped on my headlamp to find a fox about 10 yards from the edge of the tarp. Clapping, yelling and even throwing sticks didn't get him any further than 30 yards away at any given moment. OK, that's it I thought... I'm going home.

Packing up was easy but I was worried about visibility on the ride back. After some brainstorming I was able to hook my Kelty Triptease from my bear bag kit onto the back of my Camelbak to make me visible to cars coming up on me from behind. If you've pointed your headlamp at Triptease at night you know that its unnaturally reflective. I ended up choosing to take my Petzl E-Lite headlamp in favor of my Zebra mainly due to to the fact that its lighter and more comfortable. Unfortunately, its a notch below functional for effective off trail pathfinding and the following bike ride home in the middle of the night. It got me by and that's all it was designed for but I spent 15 miles of riding on the way home thinking of how much better the Zebra would be.

 I took a break on the ride home at a side of the road bait shop. The break was more to take in the night than to take a rest. Good times.

So what did I learn?
  1. Save the bivy for cool weather.
  2. Bring a decent head lamp. The e-Lite is only good around camp, honestly.
  3. Think about heading off trail and what that means if you have to get out in an odd situation. I'd do the same thing again but it worked out because I was lucky, not because I gave it good thought.
  4. Keep pushing. This was a good trip. How do I know? I'm smiling while I write this.

Friday, July 1, 2011

New Balance Minimus Shoes <=>

When I was a kid I always had to show mom & dad how fast I could run when I got new shoes. As I got older, it was a little tougher to find shoes that caused the same excitement. I have picky feet so fit is VERY important and I'm not very tolerant of breaking shoes in. I've always preferred trail runners over traditional hiking boots. I pack light and I hike with trekking poles so there's really no need for bomber boots in my opinion. Trail runners are more comfortable, lighter, dry faster if you poke your foot in the river and they're generally cooler.

I've been keeping an eye on the barefoot running fad for awhile now. The Vibram Five-Finger shoes are in every outfitter I visit. Most of the large running shoe companies have some variant of a barefoot running / free running shoe. Unfortunately, most of them have been relatively uninteresting to me until recently.

I was excited about the looks of the Merrell Trail Glove ... until I tried them on. The fit was just odd with a very tight midsole & enough room in the toe box that I wouldn't need a bivy anymore. That's only a slight exaggeration. If your feet fit in these shoes I'm not saying you're weird - I'm just saying you have weird feet.

Ultimately, I tried on the New Balance Minimus and liked the fit. They have a minimal sole without being moccasins, the construction appears to be durable and well thought out and best of all... they're actually comfortable.


So, what's the best test for your maiden voyage with new minimalist shoes? The rockiest, sandiest place on the AT - the Grayson Highlands, of course! This was my first experience hiking in the area. I know from mountain biking that trails in the Virginia mountains are famous for their rock. These trails took it to an extreme, though.

!
Caution - shoe & foot torture zone ahead!

I was honestly surprised. The trail left my feet a little fatigued at the end of the day but it wasn't significantly worse than when I hike in my favorite Brooks Adrenalines. The grip and stability was fantastic and water shedding was better than anything I've worn. The combination of the Minimus shoes and my rusty, trusty WrightSock CoolMesh II socks made for the fastest drying footwear I've ever had on the trail. I have a knack for stuffing my foot in water where ever I find it so its a feature that doesn't go unappreciated.

My feet are still dry here. Just give me a few seconds... I'll have a wet foot in no time.
I've been wearing them around town as well with similar results and I'm looking forward to my next hike on normal trails! Recommended!

Wednesday, June 29, 2011

Gossamer Gear Ceramic Coated Stakes

I tested a lot of new gear on my latest hike in the Grayson Highlands. One of my favorite gear additions is my new set of Ti V-stakes in ceramic hi-viz yellow from Gossamer. Its really  simple when you're looking at stakes:

1. Light & durable
2. Good hold & able to work in various soil conditions
3. Easy to find in ground cover / hard to loose

Bright, light & durable finish (no batteries required for day-glow finish)
Prior to this stake set, I used a pair of MSR Groundhog stakes to stake out the tarp ridgelines, four MSR Needle stakes for the four tarp corners and four generic Ti J-hooks to stake out my bug tent inner when I use it. This system has worked fine for a few years. I already had the yellow ceramic coating on them prior to Gossamer's commercial offering. My only real complaint is that the Groundhogs pack a little on the bulky side since they are y-stakes.

Ti V-stake taking on the Grayson Highlands concrete meadows

The V-stakes did very well in rock hard soil of the highlands and loamy soft soil that I found in the grassy meadow our second night out. The coating is day-glow bright - you would have to go out of your way to loose them. The ceramic coating is holding fast even with the hard, abrasive soil the first night out. The same coating on my previous stake set looks fantastic. It's significantly more durable and easier to see than typical hi-viz coatings.


Conclusion: GREAT STUFF!

Monday, June 27, 2011

Grayson Highlands Trip

Dad & I took a trip to the Grayson Highlands for a three day, two night walk. We started at the state park just over the Virginia line and planned a 25 mile loop. Our past several trips have been mileage intense so this walk was designed to take it easy. We were celebrating my dad's 70th & Father's Day so there was no need to pop off big miles.

The Highlands are famous for the ponies but the views are spectacular as well and are a great change of pace from the dense growth typical of the lower elevations of the Appalachians.

Great views constantly along the AT connector, AT & Crest Trail
Wildflowers everywhere


A rocky outlook at the AT - Crest Trail connection
More wildflowers
We walked out to the AT then to the Crest trail after an eventual (& unintended) detour on Spring Trail. We planned short miles and the walking was relatively easy so the extra miles weren't a big deal. Dad almost managed to become close friends with this guy. He was non-poisonous but it still gets your attention at that second you almost step on a snake.


The trails in the area aren't marked that well so we eventually found our way to the Crest Trail and our first night's camp after 10 miles or so. I learned that I'm not a big fan of walking trails that are dual purpose horse trails. The flies, pies and lack of sleep had me ready to sit down and relax. 


It wasn't long before we were greeted by the famous ponies. They were fun to watch and VERY curious thanks to all those before us that gave them snacks. We had to politely invite them to find another camp several times.

Prancing along... this is my meadow!
The ponies were certain that dad had pony snacks in his bag
Home Sweet Home
What we didn't expect to see came over the rise next - free range long horn cattle. There were a dozen or so of them. They were as curious as the ponies - just much larger and with lots more horn! They were determined that they were going to bed down right on top of us so we had to herd them back down the hill several times. Cows are stubborn but calm.


We woke up early the next day, took care of breakfast and hit the trail in hopes of missing possible storms. The walk from our camp to Wise Shelter on the AT was very short (~5-7 miles). After getting there it was exactly as expected - a little dirty, lots of flies and almost as many people. We decided to find a more comfortable camp site. After a short search we found a great spot in hardy grass under a tree. There were still a lot of flies but the pesky hikers were nowhere to be found.


My MLD Grace Solo & Caldera / Trapper combo
Dad prefers the Shires Tarptent Contrail
It didn't take long at all before a localized thunderstorm rolled in. It was a monster with HEAVY rain and reported 60mph gusts. One of the nice things about having a tarp is that you can invite a buddy to hang out in a pop up storm like this one so dad and I just hung out. One of the bad things about a tarp is that you're directly on the ground when heavy storms dump water so fast it runs across the top. It wasn't long before there was a 1cm deep flow running under the tarp. It wasn't a big deal but it was good for a chuckle with two 6ft 180lb guys huddled under a Grace Solo. As soon as there was a break in the storm we took all of our gear (except shelters) to the Wise Shelter to find 7 other people and a dog there. Eventually, it filtered down to us and four other people. With strong winds still in the area and having never actually used an AT shelter we decided to call it a night there. Honestly, I can't recommend it. Noisy people + stone hard floor + someone deciding that solar powered outdoor lights attached to their pack should burn all night (yes that actually happened) = a bad night's sleep. The best part? The lady who carried the lights was truly puzzled on how to lighten her load and make it to 10 miles per day for the next 21 days. This is absolutely no insult to her - just proof that UL walking needs more exposure! As a side note I was able to make it through this whole trip with no perceived need for three entire solar powered yard light systems. Maybe I don't know what I'm missing. ;)
The next day we walked out from Wise Shelter back to the park via the AT. Again, it was a pretty short day. We were out early since hard floors make for early mornings. 

Smiling because we ALMOST missed this connector with rain threatening
We did run into some NORMAL wildlife on this trip
There isn't a trail in the area that isn't littered with stones
We were back to the trail head by 8am (I told you it was an early start) and the 4 hour drive home went quickly. All things said, it was a great trip. I did a lot of new gear testing on this trip so keep a watch for those reports later this week.